If your printer is not already connected to a wireless network, you will need to connect it to your router with an Ethernet cable. Once it is connected, you can follow the instructions below to know how to connect your printer to wifi
How to Check Printer Contact On Windows

- First, make sure that your printer is turned on. Next, select Start on your computer.
- Select Settings > Devices> Printers & Scanners.
- Select Add a printer/scanner to add your printer and wait for it finds nearby printers.
- Choose your printer by looking for the model number and manufacturer name.
- If necessary, select Add device and enter your password.
- Make sure that your printer is included in the Printers & scanners section.
How to Check Printer Set Up On Mac
- Click the Apple(r), menu icon in the upper-left corner of the screen.
- Select System Preferences > Print & Scan, Printers & Scanners.
- Click the + icon to add your printer to the list.
- Select your printer’s driver or software in the Use field and then click Add.
Use A Wireless Setup Wizard To Connect Your Printer
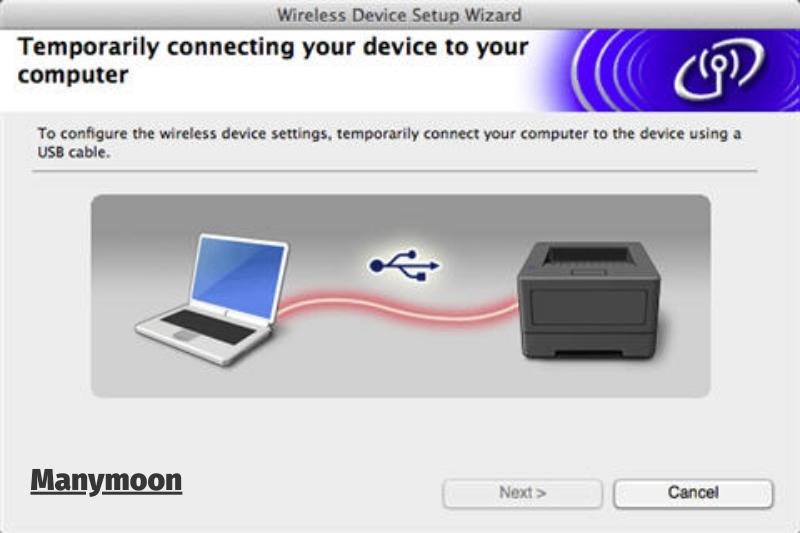
You can connect your printer to Wi-Fi using the touchscreen of your printer’s wireless setup wizard tool. Here’s how:
How to Connect Your HP Printer With WiFI
- Check that your printer is connected to your Wi-Fi network.
- Tap Setup and then tap Network or Wireless Settings.
- Choose Wireless Setup Wizard.
- Enter your password and select the name of your network.
How to Connect Your Epson Printer With Wifi
- Check that your printer is connected to your Wi-Fi network.
- The control panel will prompt you to press the Home button.
- Select Wi-Fi setup and click OK.
- After the Wi-Fi Setup Wizard appears press OK and then press OK.
- Next, select your Wi-Fi network and press OK.
- After entering your password, press OK.
- Once you are connected, you will see “Setup Complete“.
How to Connect Your Canon Printer to Wi-fi
- Check that the printer is connected to your Wi-Fi network.
- Hold the Wi-Fi button while pressing the Home button on your touchscreen.
- Next, press the LAN Wireless setup button and then click OK.
- Next, choose your Wi-Fi network and enter your password. Then press OK.
- Once you are connected, the Power and Wi-Fi lights will cease flashing.
- WPS allows you to connect your printer with Wi-Fi
A Wi-Fi Protected Setting (WPS) mode on your device can allow you to connect a printer with Wi-Fi. This allows you to connect to a wireless network, even if it’s not your name. To complete these steps, make sure your wireless router is available.
How To Connect HP Printer To WiFi With WPS

Check that your printer is connected to your Wi-Fi network.
Set your printer into WPS mode:
- Hold the Wireless button down for 5 seconds, or until the wireless light flashes.
- Press and hold the WiFi button and Power buttons for five seconds on the DeskJet 6400/6400 and Envy 6400/6400 models until the blue light flashes.
- After waiting for about a minute press and hold on the WPS button to turn on the router’s Wi-Fi. You’ll be connected once the light stops flashing.
How To Connect Your Epson Printer With Wi-FI With WPS
Check that your printer is connected to your Wi-Fi network.
- Use the WPS button to access your router.
- Press the Home button on the printer.
- Select Wi-Fi setup and click OK.
- Click on Push Button Setup (WPS), and then press OK.
- To complete the setup, follow the instructions on your printer’s screen.
- You’re ready to go when you see the Wi-Fi icon in the upper-left corner.
How To Connect Your Canon Printer To Wi-fi With WPS
Check that the printer is connected to your Wi-Fi network.
- Tap WLAN on the touchscreen. Next, press Start setup.
- Hold the WPS button for five seconds. Then, tap OK on your printer in two minutes.
- Tap OK when “Connected the access point” appears in your printer screen.
Factory Reset Your Printer

Resetting your printer’s settings may be necessary to resolve Wi-Fi problems. These steps will help you connect your device to the wireless network. NOTE: Any manual settings you have on your printer will be lost when the factory reset is performed.
How to Factory Reset HP Printer
- Turn off the printer, then unplug it for 30 seconds. Finally, reconnect the printer.
- For approximately 20 seconds, turn the printer on and hold the Resume button down.
- When the Attention light turns on, release the Resume button. While the printer restores factory settings, the Attention and Ready lights will cycle.
How To Factory Reset An Epson Printer
- Press the Home button on the control panel of the printer, then select Setup, and finally press OK.
- Click on Restore Default Settings, and then press OK.
- Next, select Reset Network Settings. Press OK.
How To Factory Reset A Canon Printer
- Select Setup from the touchscreen
- Next, select Device settings and click OK.
- Next, select Reset and press OK.
- Select Reset all, then press OK. Next, select Yes and click OK.
- Update and install drivers
- Although it may sound overwhelming, these steps are not difficult.
How To Install And Update Drivers For Windows

- Click Start > Settings > Devices. Click Print server properties under Related Settings
- Select your printer’s driver under Drivers and click Remove > Remove driver package > OK.
- Go back to Printer Server Properties and then choose Drivers >Add. To reinstall your printer driver, use the Add Printer Driver Wizard.
How To Install And Update Drivers For Mac

- Click on the Apple menu in the upper left corner, then click System Preferences.
- Choose Print & Scan, Printers & Scanners and then click the + button at the bottom left.
- Click the – button, and select your printer.
- If you see a popup menu, click the + button. Select Add Printer or Scanner.
- Click the Choose Printer button to select your printer. Next, click the Use Menu and choose from one of these:
- AirPrint(r), if you connect an AirPrint-enabled Printer with a USB Cable, select AirPrint. Your printer may not support AirPrint if it isn’t listed in the pop-up menu.
- You can use printer software that you have downloaded from Apple or installed on your computer. Click Select Software to locate your printer’s software, and then click OK.
- Print software using a Mac file: Select Other, then choose the file, and click Add.
Install an IP Printer on Windows 10 and Mac

How to find the IP address of your printer
You can add a printer to your network by adding its IP address if you are having trouble finding it on Windows or Mac.
Access your router’s settings menu to find the IP address. The instructions for how to do it are printed on a sticker on your router, usually at the bottom.
There are many options for router menus. You can search for something called “Attached Devices” or poke around until you find a list with device names. Most likely, the printer’s device name is the same as its product name. It is important to clearly label the IP address.
Windows network printers
Windows refers to IP printers as “network printers“. Click the Search icon at the bottom of your screen to set it up. Or press the Windows key + Q to type “control panel” into the Windows key + Q. Click on the Control panel, then click View devices and printers under Hardware and Sound.
Click the Add a Printer button at the top of your window. Then click Next. Click Next and check the box Add a Printer using a TCP/IP Address or hostname. Click Next and enter the IP address of the printer in the “Hostname” field. Continue following the prompts to complete the setup.
Printers for Mac IP
An IP printer on macOS should only be used as a last resort. It might not offer the full functionality that it needs depending on its protocol. An IP printer for macOS must be compatible with one of the following protocols: AirPrint (HP Jetdirect (Socket), Line Printer Daemons (LPD), or Internet Printing Protocols (IPP).
Select System Preferences, Printers & Scanners from the Apple menu and then click Add. Enter the printer information by clicking IP.
- IP address
- Select AirPrint for Protocol
- Queue – Leave blank if not certain
- Device name – To identify the printer on your Mac. It doesn’t have to match the device name in the router menu
To help you locate it from the pop-up printer menu.
Select the right software to use with the printer. Click Select Printer Software to select the printer you wish to use.
Select System Preferences, Printers & Scanners from the Apple menu and then click Add. Enter the printer information by clicking IP.
- IP address
- Select AirPrint for Protocol
- Queue – Leave blank if not certain
- Device name – To identify the printer on your Mac. It doesn’t have to match the router’s name.
- To help you locate it from the pop-up printer menu
- Select the right software to use with the printer. Click Select Printer Software to select the printer you wish to use.
Words to Know
These terms might appear when you follow a printer’s setup guide.
Driver
The printer driver is background software that shows your device how to use the printer. The driver is a piece of background software that teaches your device how to use the printer.
Your computer, tablet, or phone will automatically download and update drivers when you first connect to a printer. An internet connection may be required during setup. Windows comes with the latest printer drivers, so this step can be skipped. Apple’s AirPrint technology eliminates the need to install drivers.
You can search online for drivers if the installation isn’t automatic. You should only download the drivers from the manufacturer’s site if you can.
Key to the network
Your network key is your password for your home network, which includes your Wi-Fi. Your network key should be placed on the same sticker with the SSID if you have not changed it. We strongly recommend that you either create your own key or use a password manager.
SSID
Your Service Set Identifier is the name of your Wi-Fi connection and home network.
If your router’s SSID has never been changed, it will be printed on a sticker. This sticker is usually located at the bottom of the route.
Wireless connection
This term can be used to refer to any type of wire-free technology. It is usually used to refer to printers as Wi-Fi, Bluetooth, or both.
WLAN
Your wireless local area network (WLAN), is your Wi-Fi network.
How To Fix a Printer Not Connecting to Wi-Fi?

Updating your drivers and firmware
It is a good idea to update all software before you start troubleshooting. Go to the website of your printer manufacturer, whether it’s HP (Opens in new window), Brother (Opens in new window), or another brand. Search for the model number in the support section.
To ensure that every link in your chain is up-to-date, download and install the most recent driver, software package and/or firmware updates. It’s possible that one of the updates has fixed your connection problems since you purchased the printer.
Reboot or unplug to start fresh
This is a common phrase in tech circles. However, with printers, it is more frequently true: Sometimes, you just need to turn it off and then turn it on again. It is common to press and hold the power button until the printer shuts down. However, it might ask you to clear the queue before it does so. If it doesn’t work, such as mine saying “busy”, it may be necessary to unplug the device completely and then plug it back in.
Although it’s great when the printer connects, this doesn’t mean that there is a permanent solution. However, you could plug your printer into a smart outlet and use an assistant like Alexa or voice to restart it.
Remove and re-add your printer in Windows
Similar to the previous point, my printer sometimes thinks that everything is fine, even though it’s listed as offline in the Windows Printer & Scanner settings. Go to Settings > Devices> Printers & scanners and select your printer. Then, delete it. To add it back to the device list, click on the Add a printer or scanner button. This is a frustratingly simple way to get things back up and running.
It’s closer to your Router
Although I don’t know why I have seen Wi-Fi printers with weak signals, this is despite all of my devices working in the same place. My printer works better if it is in the same space as the router. And my father-in-law’s printer will only work if he opens all doors upstairs before printing.
If your Wi-Fi signal is not strong in the room, you can move the printer closer to the router to resolve any connection problems. Your printer may require a strong signal to keep connected if it has a weak Wi-Fi chip. This should be obvious, but ensure that the Wi-Fi password and name are correct.
Connect the Printer to Your Router Straightly
You can be flexible with where your printer is stored. Although it may not resolve all of your problems, it will make it much easier to connect it to the network. It will also ensure that it is more stable and reduce the number of troubleshooting steps required.
You can connect Ethernet to your home network if you have it. If so, check your printer manual for an Ethernet jack. I’ve found them in difficult-to-find locations. This is the area where powerline adapters can be used if you don’t have Ethernet.
If your printer does not have an Ethernet jack, you can move it to the same place as your router and plug it into your router over USB. Then, see if your printer works better.
You can connect it to a computer and share it that way instead
You have two options if you’re unable to connect your printer directly to the router: first, connect it over USB to your computer, and then use the built-in printer sharing feature on your computer to print from other computers in your house.
After you have connected the printer to your computer and configured it as a wired printer, you can then share the printer with Windows. Click on the printer to open Settings > Devices > Printers & Scans. Then, choose Manage > Printer properties. You should see the option to share this printer under the Sharing tab.
Mac users can do the same thing from System Preferences > Sharing> Printer Sharing. Simply check the Printer Sharing box and check the box next to the printer you wish to share. Then add it to your other computers just like a normal network printer.
Although this solution is not always easy, it can be a good option if your printer refuses to connect to Wi-Fi.
Don’t miss:
FAQs

1. What is an IP address for an HP printer?
Touch Settings > Wi-Fi > Display Network Configuration> Display Network Summary (or something similar). It should display at most four lines: IP Address, Hostname and MAC. If it does not, the printer is not connected to a network.
2. How do I find the IP address for my printer?
Open Control Panel > Hardware & Sound > Devices & Printers. Right-click on the printer and choose Properties. If only three tabs are displayed, look in the Web Services tab to find your IP address. If you see five tabs, then look in the Ports tab.
3. Why can’t my HP printer connect to my wireless network?
First, restart your computer, printer, and wireless router. You can check whether your printer is connected via the wireless network test report that you can print from your printer control panel. This report can be printed directly by pressing the Wireless button on many printers.
Conclusion
In short, To connect your printer to a Wi-Fi network, you’ll need the network name (SSID) and password. Once you have that information, you can follow the instructions that came with your printer to connect it to the network. Once your printer is connected, you should be able to print from any computer or device that’s also connected to the same network.
Please share this post if you found it helpful so that others might see its contents as well! Thank you for reading!

