One of the most common tasks in Excel is setting the print area. This allows you to specify which cells you want to print and which ones you don’t. There are a few different ways to set the print area in Excel, depending on your needs. In this article, Manymoon will show you how to set print area in Excel so that you can get the perfect printout every time and other info
Set the Print Area

Sometimes, you might only need to print a portion of a worksheet. It is possible to define an area so that only the specified cell range can be printed when you print.
- Choose the cells that you wish to print.
- Click on the Page Layout tab.
- Click on the Print Area button.
- Choose Set Print Area.
Remove a Print Area

- Click on the Page Layout tab.
- Click on the Print Area button.
- Select Clear Print Area.
Adjust Page Breaks

- Click on the View tab.
- Click on the Page Break Preview button.
- The worksheet is displayed in the Page Break Preview view.
- Click and drag a page break to move it to another location.
More Informative Way To Define Print area in Excel

You want to see your settings visually? This transparent method allows you to define a print area.
- Click the Dialog Launcher Dialog launcher on the Page Layout tab. This will open the Page Setup dialog.
- Place the cursor on the Print area field of the Sheet tab and choose one or more ranges from your worksheet. You can select multiple ranges by pressing the Ctrl key.
- Click OK.
Tips and Notes
- The print area of the workbook is saved when you save it. Only that area of the worksheet will be printed when you send it to the printer.
- Press Ctrl +P to review each page preview and make sure you are only selecting the areas that you want.
- You can quickly print a portion of your data by pressing Ctrl+P without having to set a print area.
How to set Multiple Print Areas in Excel
You can print multiple parts of a worksheet by selecting multiple areas.
- Hold down the Ctrl key to select the first range.
- Click Print Area > Set Print area on the Page Layout tab.
Done! You can now create multiple print areas, each representing a page.
Note. This applies only to non-contiguous ranges. Even if they are not selected separately, adjacent ranges will be printed in one print area.
How to get Excel to Ignore The Print Area
If you need a hard copy of an entire sheet or workbook, but don’t want to clear all print areas, tell Excel to ignore them.
- Click File > Print, or press Ctrl+ P.
- Click the Settings arrow beside Print Active Sheets, and then select Ignore Print area.
How to Print Multiple Areas In One Page

Excel cannot control the ability to print multiple areas on a single sheet of paper. It is controlled by a printer model. You can check whether this option is available by pressing Ctrl+P, clicking the Printer Properties link, then switching through the tabs of the Printer Properties dialog box looking for the Pages per sheet option.
If your printer offers such an option, you’re lucky! You can link copied ranges to original data using the Paste Special feature.
- To copy the print area, select the first one and press Ctrl+C.
- Right-click any empty cell on a new sheet and choose Paste Special > Link Picture.
- For other areas, repeat steps 1 and 2.
- To print all areas that have been copied, use the Ctrl+P key to open the new sheet.
How to Modify Excel’s Print Area
Did you accidentally include irrelevant data? Or did you miss some important cells? There are three easy ways to edit Excel’s print area.
How to expand the print area in Excel

You can add additional cells to your existing print area by following these steps:
- Select the cells you would like to add.
- Click Print Area > Add To Print Area on the Page Layout tab.
This is the fastest way to change the print area, but it is not transparent. Here are some important points to keep in mind:
- Only if the worksheet has at least one printable area will the Add to Print Area option appear.
- If the cells that you add are not within the existing print area of the printer, a new area is created, and the page will be printed as a separate page.
- If the new cells are located adjacent to an existing print area, they’ll be printed on the same page and included in the same area.
Edit print area in Excel by using Name Manager
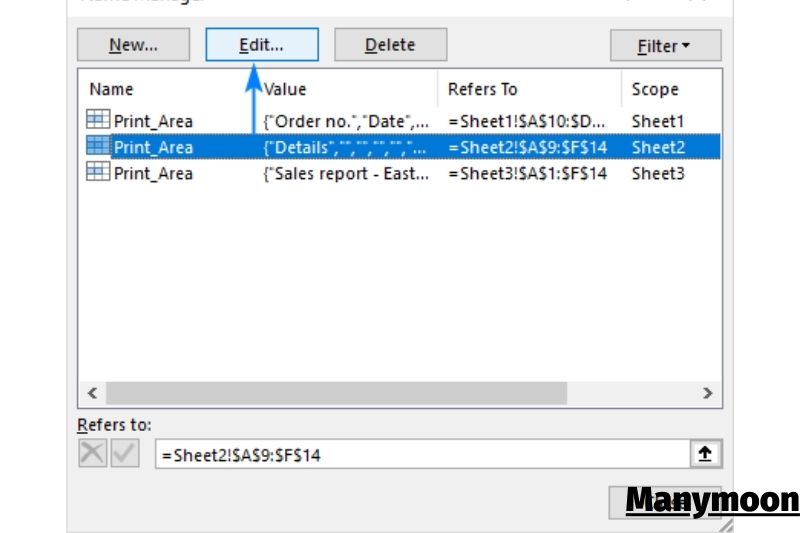
Excel creates a Print_Area range when you set a print area. You can modify that range at will. Here’s how:
- Click Name Manager on the Formulas tab in the Defined Names section. Or press the Ctrl + F3 shortcut.
- Select the range that you wish to edit in the Name Manager dialog box and click on the Edit button.
Use the Page Setup dialog box to change the print area

The Page Setup dialog box is another quick way to modify Excel’s print area. This method allows you to make any changes that you wish, such as changing the print area or adding a new one.
- Click the Dialog Launcher (a small arrow at the lower-right corner) on the Page Layout tab.
- The Print area box can be found on the Sheet tab in the Page Setup dialog box. You can make edits there.
- You can modify the print area by deleting the previous one and manually entering the references.
- You can replace the area by placing the cursor in the “Print area” and selecting a new area on the sheet. This will delete all existing print areas so that only the selected area is printed.
- Press and hold the CTRL key while choosing a new range. This will create a new area for printing in addition to the one(s) already set.
How to Clear Print Area in Excel

It is as simple as setting the printer to clear any print area.
- The worksheet you are interested in is now open.
- Go to the Page Layout tab > the Page Setup group, and then click on the Clear Print Area button.
How to Lock Excel print area
You may want to lock the print area if you share workbooks with others. This will prevent anyone from printing out your workbooks. Unfortunately, Excel does not have a direct way to lock the print area.
VBA is the only way to protect Excel’s print area. This is done by adding the Workbook_BeforePrint event handler, which silently forces the specific print area to be printed just before printing.
You can also set the event handler on the active sheet. This is simpler but comes with these caveats:
- All worksheets should use the same print speed.
- Before printing, you will need to choose all tabs on the target sheet.
The macro above sets the print area for Sheet1 to A1; D10 and Sheet2 to A1; F10. These can be modified as you wish and added to as many sheets as you like.
These steps will allow you to add the event manager to your workbook:
- To open the Visual Basic Editor, press Alt + F11.
- Expand the node of the target workbook in the Project Explorer window to the left and double-click ThisWorkbook.
- Paste the code into the ThisWorkbook Code window
How to View A Print Preview

- To see a preview of the page when it is printed, go to the Page Layout tab. Click the arrow in the bottom right corner on the Page Setup section.
- Click “Print Preview.”
- The sheet will then look exactly as it did when printed. To return to your sheet, click the arrow at the top left.
FAQs

1. Why won’t Excel Let Me Set the print Area?
Clearing or setting a print area in Excel can help if your Excel spreadsheet doesn’t print properly. Sometimes, the wrong print area was set. In this case, you will need to clear. Click the Print Area icon to clear the print area.
2. How can I adjust the print area of my screen?
Use the “Windows + Shift + s” key combination. Your screen will become grayed and your cursor will change. To select the area of your screen that you wish to capture, click and drag. You will receive a screenshot of the selected screen area in your clipboard.
3. How can you stop Excel columns from printing?
Click on the “Sheet Options” tab. Clear the checkmark in the box next to “Print” in the column. Column headings will not be printed anymore. Click on the “Microsoft” icon, then choose “Print”, and then click “OK.”
Conclusion
You may easily set the print area in Excel by following the above instructions. Please leave your remarks in the comment box if you have any questions or want to share your experience with this post. Thank you for your time spent reading.
